Installing Hyper-V on Windows Server 2025 Core
Prerequisites for installing Hyper-V
Regardless of the Hyper-V features you want to use, you’ll need:
- A 64-bit processor with second-level address translation (SLAT): To install the Hyper-V virtualization components such as Windows hypervisor, the processor must have SLAT, also known as nested paging. However, it’s not required to install Hyper-V management tools like Virtual Machine Connection (VMConnect), Hyper-V Manager, and the Hyper-V cmdlets for Windows PowerShell.
- CPU support for VM Monitor Mode Extension (VT-x on Intel CPUs)
- Enough memory – plan for at least 4 GB of RAM. More memory is better. You’ll need enough memory for the host and all virtual machines that you want to run at the same time.
- Virtualization support turned on in the BIOS or UEFI:
- Hardware-assisted virtualization: This is available in processors that include a virtualization option – specifically processors with Intel Virtualization Technology (Intel VT) or AMD Virtualization (AMD-V) technology.
- Hardware-enforced Data Execution Prevention (DEP) must be available and enabled. For Intel systems, this is the XD bit (execute disable bit). For AMD systems, this is the NX bit (no execute bit).
You can also open an administrative command prompt or Terminal and run:
Systeminfo.exeCode language: PowerShell (powershell)Then, you can scroll down to the Hyper-V Requirements section for details.
Installing Hyper-V with Powershell
Open a PowerShell prompt with administrator privileges and run the Install-WindowsFeature cmdlet:
Install-WindowsFeature -Name Hyper-V -IncludeManagementTools -RestartCode language: PowerShell (powershell)Note in the above command, the “-IncludeManagementTools” parameter is included. This parameter tells PowerShell also to install the Hyper-V Management Tools, Hyper-V Module for Windows PowerShell, and Hyper-V GUI Management Tools.
If you only want to install the Hyper-V Windows Server Role, you can omit this parameter, and it will only install the Hyper-V Role itself, without the management tools. Also, installing the Windows Server Hyper-V Role requires a restart. If you pass in the “Restart” parameter, the server will be restarted as soon as the installation of the Windows Role is complete.
If you don’t want to restart the designated Hyper-V host immediately, you can leave off the “Restart” parameter and restart the Windows Server manually.
It should automatically reboot the server when the installation is successful. To quickly verify the role is installed, just use the Get-WindowsFeature cmdlet from any computer on the domain.
Get-WindowsFeature -ComputerName <Servername>Code language: PowerShell (powershell)You should see Installed next to ‘Hyper-V’ (or an ‘x’):

Remotely manage Hyper-V in a workgroup environment
As it turns out, if your Hyper-V server is in a workgroup and not a ActiveDirectory domain, there is additional work needed. Let’s break down, which work we got to do.
On the Hyper-V Server
- Networkprofiles have to be set to “Private”
- To check if it’s already set, open an elevated PowerShell command prompt and type in the following:
Get-NetAdapter | Get-NetConnectionProfile - if you have to set the Networkprofiles to private type the following command:
Set-NetConnectionProfile -InterfaceAlias <NameOfAlias> -NetworkCategory Private
- To check if it’s already set, open an elevated PowerShell command prompt and type in the following:
- Enable-PSRemoting
- to enable management over PowerShell
- Enable-WSMANCredSSP -Role server
- The
Enable-WSManCredSSPcmdlet enables CredSSP authentication on a client or on a server computer. When CredSSP authentication is used, the user credentials are passed to a remote computer to be authenticated. This type of authentication is designed for commands that create a remote session from another remote session. For example, if you want to run a background job on a remote computer, use this kind of authentication.
- The
On the Client
- Networkprofiles have to be set to “Private”
- To check if it’s already set, open an elevated PowerShell command prompt and type in the following:
Get-NetAdapter | Get-NetConnectionProfile - if you have to set the Networkprofiles to private type the following command:
Set-NetConnectionProfile -InterfaceAlias <NameOfAlias> -NetworkCategory Private
- To check if it’s already set, open an elevated PowerShell command prompt and type in the following:
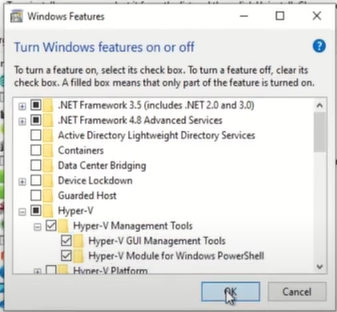
- Install the Hyper-V Management Tools
- over the GUI
- over PowerShell
Enable-WindowsOptionalFeature -Online -FeatureName Microsoft-Hyper-V-All
- over the GUI
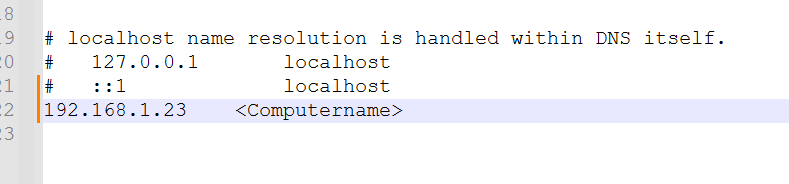
- Edit the hosts-file
- Open the hosts-file under “C:\Windows\System32\drivers\etc”
- Add the Computername of your Hyper-V server and the corresponding IP-Address to that hosts file and save it
- Start the WinRM service
- open an elevated PowerShell command prompt and type
Start-Service -Name winrm
- open an elevated PowerShell command prompt and type
- add the Hyper-V server to the TrustedHosts (I show you the example of adding multiple names to the TrustedHosts-File in case you need it)
Set-Item WSMan:\localhost\Client\TrustedHosts -Value '<ComputernameA.local','ComputernameB' - Stop the WinRM service
- open an elevated PowerShell command prompt and type
Stop-Service -Name winrm
- open an elevated PowerShell command prompt and type
- Test PowerShell Remoting
Invoke-Command {WHOAMI} -Computername <HyperVServername>.local -Credential .\Administrator- if you got a output of “WHOAMI” and it shows you the Hyper-V servername, then you are sure that PowerShellRemoting is enabled and working!
- Allow delegation of credentials
- run gpedit.msc to edit the local group policy on your Client-Machine
- under Administrative Templates -> System -> Credentials Delegation
- you have two policies in which you are interested in
- Allow delegation of fresh credentials
- check if the FQDN of your server is set, and add the SPN as well (<Servername>)
wsman/<Servername>.localwsman/<Servername>
- Allow delegation of fresh credentials with NTLM-only server authentication
- check if the FQDN of your server is set, and add the SPN as well (<Servername>)
wsman/<Servername>.localwsman/<Servername>
- Allow delegation of fresh credentials
- run gpedit.msc to edit the local group policy on your Client-Machine
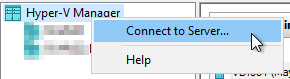
- Open Hyper-V Manager and connect to the Hyper-V server
- Run Hyper-V Manager
- Choose Connect to a server
- Toggle the Checkbox “Connect as another user”
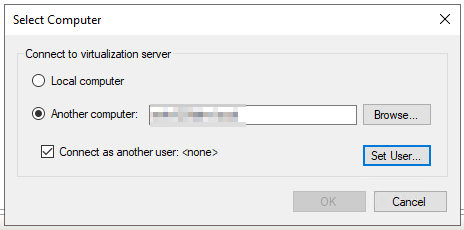
- Enter the local Administrator of the Hyper-V server and select “Remember me”

- You successfully connected to your Hyper-V server!