Introduction
Building a Failover Cluster usually requires expensive SANs and dedicated hardware. This guide documents how to achieve High Availability (HA) using two Dell OptiPlex nodes (running Windows Server Core) and a QNAP NAS for shared storage, all over standard 1GbE networking.
The Architecture
-
Compute Nodes: 2x Dell OptiPlex (Hyper-V-01, Hyper-V-02)
-
OS: Windows Server 22025 Core (No GUI)
-
Storage: QNAP NAS (iSCSI Target)
-
Networking: Single 1GbE physical link per node (converged management + storage + VM traffic).
Storage Configuration (iSCSI)
The cluster requires “Shared Storage” so both nodes can access VM files simultaneously. We used iSCSI to map a drive from the QNAP to the servers.
QNAP Setup
-
Created a 800 GB LUN (VM Data) and a Shared folder (Quorum Witness)
-
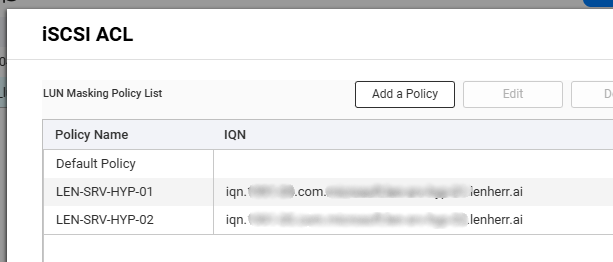
Crucial Step: Configured ACL/Masking on the NAS to trust the IQN (iSCSI Name) of both servers. Without this, the second node cannot see the disk.
To allow both servers to see the LUN simultaniously we have to get the IQN of the servers first with this command.
(Get-InitiatorPort).NodeAddressCode language: PowerShell (powershell)Now we explicitly allow these two IQN’s on our LUN, in QNAP you click on your LUN and click in the top right corner on iSCSI ACL
Server Setup
To get this to work we have to setup up iSCSI on the server as well.
Start-Service msiscsi
New-IscsiTargetPortal -TargetPortalAddress <QNAP_IP>
Get-IscsiTarget | Connect-IscsiTarget -IsPersistent $TrueCode language: PowerShell (powershell)
First we start the iSCSI-Service, later we connect to the iSCSIPortal and finally we connect the Target.
Note the -isPersistent $True is set, so we automatically reconnect after a reboot or power loss.
Formatting
To be able to use the disk later we have to do some addional work. This one you have to do only on one Hyper-V.
Initialize-Disk -Number X -PartitionStyle GPTCode language: PowerShell (powershell)Create a new parition,
New-Partition -DiskNumber X -AssignDriveLetter -UseMaximumSizeCode language: PowerShell (powershell)and format the volume.
Get-Partition -DiskNumber X | Format-Volume -FileSystem NTFS -NewFileSystemLabel "VM-Data"Code language: PowerShell (powershell)Now you can run the following command on the other Hypervisor and the volume appears.
Update-HostStorageCacheCode language: PowerShell (powershell)Building the Cluster
Install the features
To install the corresponding Features we run these command on both nodes:
Install-WindowsFeature -Name Hyper-V, Failover-Clustering -IncludeManagementTools -Restart
Code language: PowerShell (powershell)
Validation
After installing the features we validate if the cluster can be set up with our current setup.
Test-Cluster -Node Hyper-V-01, Hyper-V-02Code language: PowerShell (powershell)
You should get an output like this. We ignore these warnings, it probably will say something like “only one NIC for your cluster is not safe” etc.
Creation
We create the cluster with this command.
New-Cluster -Name "LabCluster" -Node Hyper-V-01, Hyper-V-02 -StaticAddress <ClusterVirtualIP>Code language: PHP (php)CSV – Cluster Shared Volumes
After the creation of the cluster completed successfully we turn the iSCSI disk into a CSV so both nodes can write to it at once.
Add-ClusterSharedVolume -Name "Cluster Disk 1"Code language: PowerShell (powershell)Quorum
We used a dedicated shared folder as a Quorum in this cluster. A Quorum makes sure only one node can manage the same VMs. If there is a network outtage the Quorum ensures only one half of the cluster remains active, preventing a “split-brain” scenario.
Migrating Running VMs
My VMs were powered off earlier so now we can move the Vms to the CSV.
Move-VMStorage -VMName "MyVM" -DestinationStoragePath "C:\ClusterStorage\Volume1\MyVM"Code language: PowerShell (powershell)Once moved, we add the ClusterVirtualMachineRole for each VM.
Add-ClusterVirtualMachineRole -VirtualMachine "MyVM"Code language: PowerShell (powershell)I got a warning as ouput and was worried first, but the system is giving out a warning because the state of the ClusterVirtualMachineRole os “Offline”.

We verify that this is the case.
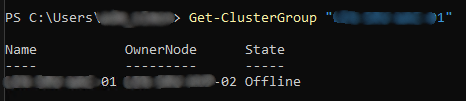
And this is totally fine, cause our VM were offline as well. So we start the ClusterGroup.
Start-ClusterGroup "<NAMEOFCLUSTERGROUP"Code language: PowerShell (powershell)Validation
To validate if the cluster is actually doing the failover we move one of our VMs from node Hyper-V-02 to Hyper-V-01, while running a ping an that Machine.
Move-ClusterVirtualMachineRole -Name "<NAMEOFSERVER>" -Node "<NAMEOFNEWNODE>"Code language: HTML, XML (xml)Your pinging window should look similar to this.
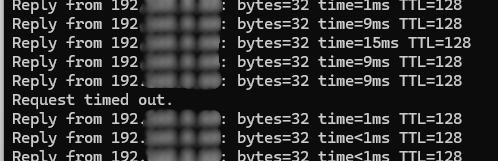
And confirms that the failover cluster is up and running. We succeeded!
Encountered Problems
Networking & The “Ghost IP” Problem
This was the hardest part. converting a physical adapter to a Hyper-V Virtual Switch (vSwitch) on Server Core often defaults the new virtual adapter to DHCP, causing IP conflicts and breaking remote connectivity.
The Fix: The “Atomic” PowerShell Command To set a Static IP on the vSwitch without killing the remote RDP/PowerShell session, we used a chained command:
Get-NetIPAddress -InterfaceAlias "<YOURvETHERNETALIAS>" | Remove-NetIPAddress -Confirm:$false; New-NetIPAddress -InterfaceAlias "<YOURvETHERNETALIAS>" -IPAddress <IPOFYOURSERVER> -PrefixLength 24 -DefaultGateway <IPOFYOURGATEWAY>; Set-DnsClientServerAddress -InterfaceAlias "<YOURvETHERNETALIAS>" -ServerAddresses ("<IPOFYOURDNS>")Code language: PowerShell (powershell)Key Networking Requirements
-
IPv6 must be enabled or the Cluster virtual adapter (NetFT) fails.
You can enable IPv6 with this commandEnable-NetAdapterBinding -Name "Ethernet" -ComponentID ms_tcpip6 -
vSwitch Names must be identical (case-sensitive) on both nodes
-
Hosts file, we hardcoded the Management IPs to force WMI traffic over the LAN instead of the internal Cluster APIPA network
Solving “RPC Server Unavailable”
We encountered the infamous RPC Server Unavailable error when the nodes tried to communicate. This is common on Server Core because standard firewall rules are often disabled by default.
To fix this we enabled the corresponding firewall rules:
Enable-NetFirewallRule -DisplayGroup "Remote Volume Management"
Enable-NetFirewallRule -DisplayGroup "*Cluster*"
Enable-NetFirewallRule -DisplayGroup "Windows Management Instrumentation (WMI)"Code language: PowerShell (powershell)
Tip: Make sure your Get-NetConnectionProfile shows DomainAuthenticated. If it says Public, cluster traffic is blocked regardless of rules.
Conclusion
The result is a fully functional 2-node Failover Cluster. We verified it by running a continuous ping to the VM and live-migrating it between nodes. The ping dropped for less than 1 second.